
Let’s get right to it! You made your PowerShell script and now you want to automate in some way. It could start when a user logs in, at particular times on particular days/weeks/months. Lots to pick from.
The Script
For this guide, we will be using a very simple PowerShell script that captures the processes running at the time and logs them to a file:
# Set the name of the log file you will make with a variable
$LogName = "Processes_running.log"

# Get the current date and time and write it to the log file
# -Append causes the script to keep writing to the same file every time, preventing overwriting
Get-Date | Out-File $LogName -Append

# Get the list of current processes and write them to the log file
Get-Process | Out-File $LogName -Append
The output will be similar to this, but with the processes you have running
Sunday, May 8, 2022 5:57:51 PM

Handles  NPM(K)    PM(K)      WS(K)     CPU(s)     Id  SI ProcessName
-------  ------    -----      -----     ------     --  -- -----------
    383      22    11988      28920       0.13   2884   1 ApplicationFrameHost
    465      19     1668       4996               416   0 csrss
    326      17     1664       4924               500   1 csrss
    427      16     4196      20252       0.69   2908   1 ctfmon
    263      14     3860      13888               356   0 dllhost
    221      17     3416      11904       0.06   6724   1 dllhost
   1044      46    63144     101496               980   1 dwm
...
Automate with Task Scheduled in Windows
- Open Task Scheduler
(You can press Windows Key + R and entertaskschd.msc, click OK) - (Optional) Create a folder for your scripts for an extra level of organization.
Click then right-click on Task Scheduler Library:- Select New folder
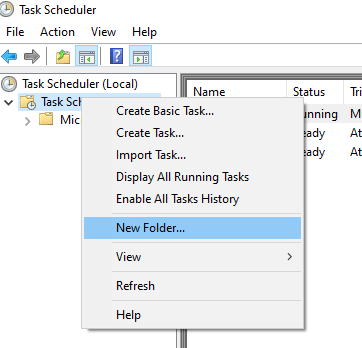
- Enter the name for your script folder, and click OK.
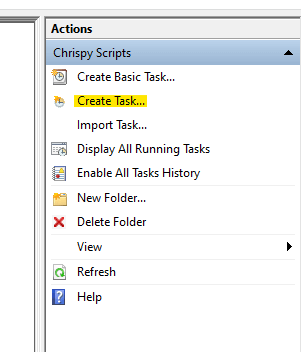
- Click your new folder in the left-hand panel.
- Select New folder
- On the right side of the window, click Create Task…
- Now beings the configuration! In the General tab
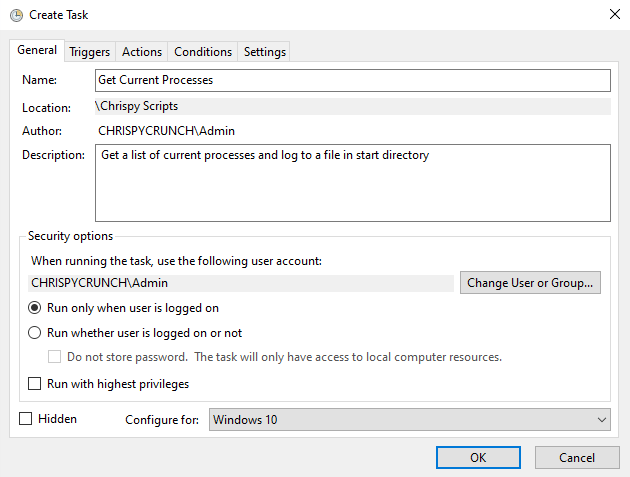
- Name: Set the name for the task, and use something that will make it easy to identify.
- Description (optional): Enter a description if you want.
- When running the task, use the following user account: This can be set to a system account or user account. Just make sure they have the proper permissions to run the script and write to the start in directory (more on that shortly).
- Select either:
- Run only when user is logged on:
The selected user (click Change User or Group to change the target user) must be logged in for the task to run. - Run whether the user is logged on or not:
Windows will run the task whether the start-as user is logged in or not. You will be prompted to enter the (correct) password for that account.- Do not store password: Won’t store the password and uses S4U, check out this TechNet article for a much more technical description of Task Security Context.
- Run only when user is logged on:
- Run with highest privileges: Basically ‘Run as Administrator
- Hidden: Run the task in the background without a GUI. Select this if you don’t want the PowerShell window to flash on the screen when the task runs.
- Configure for: This is only really used for exporting tasks to another machine. You would select the Windows OS you were making this task for. If you are not doing that, just set it to anything you think looks cool.
- In the ‘Triggers’ tab, click new (you can add multiple triggers if you would like)
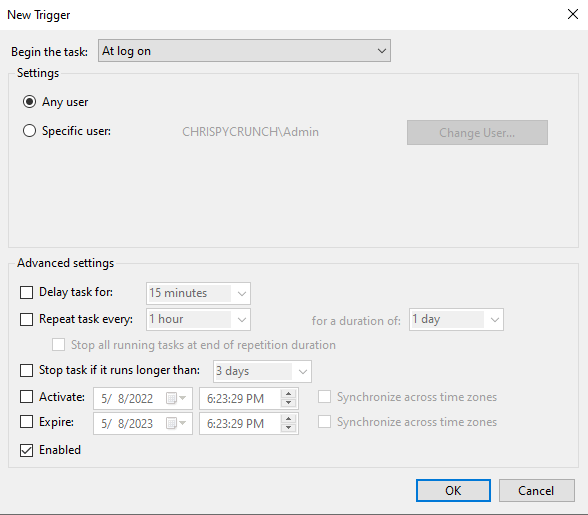
- Begin the task: Select from the drop-down, the type of trigger you want. For full details on each, check out Trigger Types. For this guide, I will set this to At log on.
- For this trigger type, I can select if this will trigger for any user or a specific user. I’m going to select Any user for now.
- Now we enter the ‘Advanced settings‘. In general, you can leave this be, but you are welcome to customize it. There isn’t anything cryptic in these settings, they are pretty self-explanatory. So I won’t go into detail on each.
Note: Enabled is required if you want this trigger to be enabled. - Click OK when done
- Next, we move into the Actions tab. Click New and you will be presented with this window
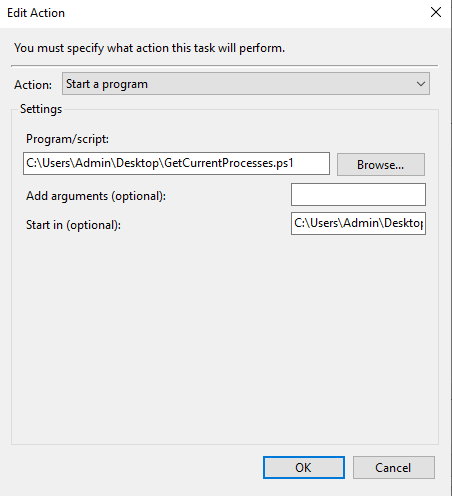
- Action: Start a program is the only one I recommend at this time as the other two options are deprecated and who knows what bugs could occur build to build.
- Program/script: Click Browse or paste the full path to your script file.
- Add arguments (optional): You can add arguments as you would in command line if your script supports them. My script does not have params so I will skip this.
- Start in (optional, but VERY IMPORTANT): Though this is technically optional, this option has incredible importance for your PowerShell script’s execution. See that I have C:\Users\Admin\Desktop as my ‘start in’? This tells the Task Scheduler where to start your script from. In this guides script, I purposefully set the Out-File to just be the file name, which means PowerShell will output the log to the directory the script is running in.
- Click OK when done.
- The Conditions tab
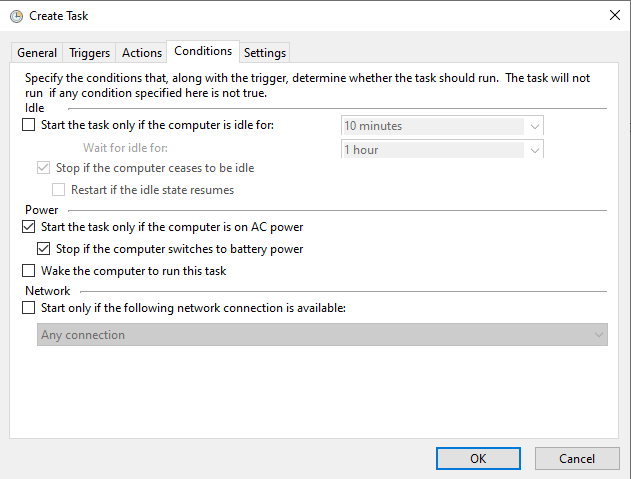
- Start the task only if the computer is idle for: n time units: Only check this if you want your script to trigger when the computer is ‘idle’ for n seconds/minutes/hours/etc. However, the definition of ‘idle’ is quite blurry. I’ve not had much luck with the consistency of this setting, so your mileage may vary.
- Stop if the computer ceases to be idle: Sub-option to ‘Start the task only if the computer is idle…’. Theoretically, this setting would kill the task when it detects your PC isn’t idle.
- Restart if the idle state resumes: Enabling this option will restart the task immediately after the PC is idle again.
- The first two options under Power are pretty much only for laptops, if either of these applies to you, select the desired options.
- Wake the computer to run this task: This option, if your hardware and settings allow it, will wake the computer to perform this task. It will not, however, put the PC back to sleep again once it has finished.
- Start only if the following network connection is available: This is a neat setting. You could set this to only run, with all other triggers in mind, if you are connected to a specific network connection. So if you only wanted this to run when on Wi-Fi but not on LAN, you could do that!
- Start the task only if the computer is idle for: n time units: Only check this if you want your script to trigger when the computer is ‘idle’ for n seconds/minutes/hours/etc. However, the definition of ‘idle’ is quite blurry. I’ve not had much luck with the consistency of this setting, so your mileage may vary.
- Last but not least, the Setting tab!
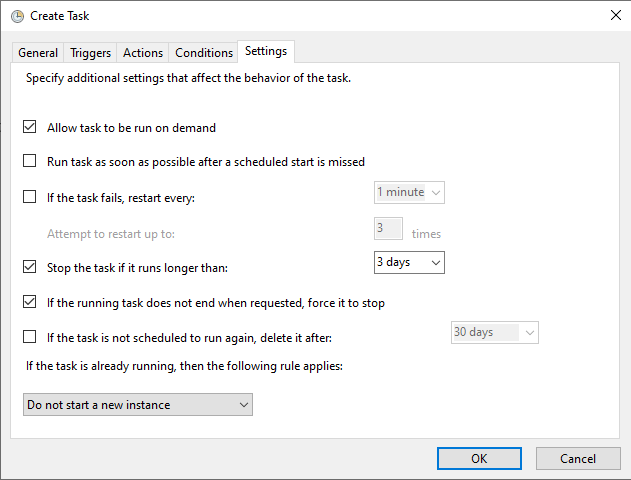
- Most of these settings are also pretty self-explanatory, but I will call out the ones that I found interesting.
- Allow task to be run on demand: Basically enabled the option to run this task manually. Why is this an option you may ask? If you are deploying a script to end-users in an IT/Enterprise setting, you may not want users to be able to run this script manually due to network load, PC resources to only be used after hours, policy, or whatever floats your boat.
- If the task is already running, then the following rule applies:
- Do not start a new instance:
If the task is running when the next trigger fires, it will stop the newly triggered instance of this task. - Run a new instance in parallel:
Each time a trigger fires, it will start a new, separate instance of the task. Careful though, if you have a file locked by the first instance and the subsequent tasks run, they might fail due that required file being locked. - Queue a new instance
If the original task has not finished, Task Scheduler will queue the newly fired triggers. Using the ‘End’ button in Task Scheduler will cancel the queue. - Stop the existing instance
Pretty much what it says. If the same task is triggered while a previous instance of this task was running, it will stop the original task. The opposite of ‘Do not start a new instance’.
- Do not start a new instance:
- If you elected to run this task as a different account than the one you built it with, it will prompt you to enter the password for that account. If you didn’t do that… You’re all done!
- If you want, you can click ‘Run’ with the task highlight in Task Scheduler to try it out! Or wait for it to trigger.
If you found this post helpful, consider sharing it. It really helps! Thanks!